There are right and wrong ways to bandage horses’ limbs, no matter the wrap’s purpose
By Christy Corp-Minamiji, DVM
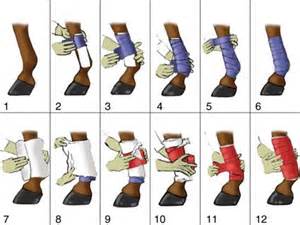
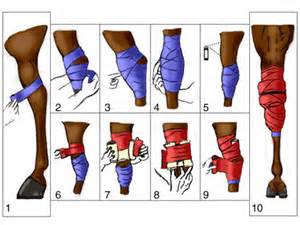
At some point nearly every horse, from the fine-boned, flashy Arabian halter horse to the cowboy’s sturdy, no-frills roping mount, will sport a wrap or bandage on one or more legs. Just because we see bandages around the barn frequently doesn’t mean bandaging and wrapping are easy, and that bandages and wraps are interchangeable and always appropriate. Before you reach for the nearest roll of Vetrap or grab that splint boot out of your tack trunk, look at some of the basic principles behind bandaging or wrapping equine limbs.
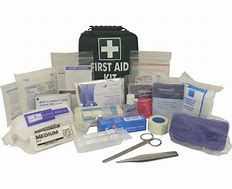
Owners commonly apply bandages to shield recent wounds or tendon or -ligament injuries, to protect during shipping or performance, and to prevent fluid accumulation in the limb (“stocking up”) during stall rest. Reid Hanson, DVM, Dipl. ACVS, ACVECC, professor of equine surgery and lameness at Auburn University’s College of Veterinary Medicine, in Alabama, adds topical dressing application, immobilization, and support to this list. However, bandaging and wrapping, while useful, are not wholly benign. Improper application and/or use of an inappropriate bandaging material can do more harm than leaving the leg unwrapped.
Architecture of a Bandage
Bandage design varies according to purpose, but most bandages include the same two to three layers:
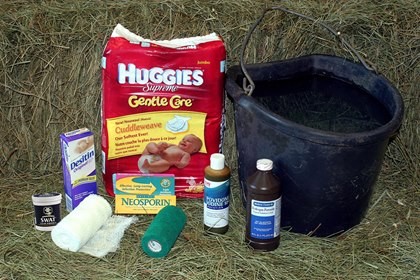
· Topical dressing, which might be a liniment, medicated pad, ointment, or powder. These are generally used in horses with injuries or skin conditions.
· Thick cotton padding such as practical (roll) cotton, layers of sheet cotton, cast padding, or fabric quilt or pillow wraps.
· Compressive/securing layer such as stable/track bandage, Vetrap, gauze, polo wrap, elastic tape, or stockinette.
Of course, veterinarians might modify or augment this basic structure to suit particular circumstances. They might recommend adding splints or bandage casts to provide immobilization in the case of a wound in a high motion area or with a severe tendon injury. As for protection, owners might use Velcro-style shipping boots, single-layer devices that provide skin protection but little compression. In contrast, some wraps and boots intended for performance might provide focal protection suited to a particular sport.
And some might not look like a traditional or prefabricated bandage at all. For some wounds, such as those in areas that are difficult or detrimental to immobilize or where topical medication application is the main requirement, Hanson describes a minimalist wound covering technique known as the “Jolly method.” This technique uses Velcro tabs to secure a wound dressing and a stockinette tube as covering.
Bandage and Wrap Uses
Wounds Owners and veterinarians commonly bandage limbs to protect wounds and surgical sites. A bandage can prevent contamination, provide compression to minimize swelling, hold topical medications against the wound, reduce motion of the wound edges, and keep the exudates (pus) in contact with the wound.
Although exudate triggers an “ick” response in many people, that yellowish slime serves a critical purpose in the healing process. “The exudate has all of the cytokines (cell-signaling proteins) that -produce healing,” says Hanson. Many horse owners “see exudate and assume (the wound) must be infected, and so they get their iodine scrub and clean it,” but Hanson cautions against this. By scrubbing a healing wound, “they’ve removed all the good juice that allows it to heal.”
Hanson prefers using an acemannan (an aloe vera derivative) wound cleanser that is gentle to the tissues. “You should not clean a wound with anything you are not willing to put in your eye’s conjunctival sac,” he notes as a rule of thumb.
Excessive swelling or motion of the wound edges can delay wound margin contracture, a major step in the healing process. A bandage that applies compression can help prevent fluid from accumulating in the limb in response to injury and reduce this swelling.
To reduce movement, however, the veterinarian might need to amend the basic bandage design. A standard soft wrap-type bandage often does not provide sufficient immobilization regardless of how thickly or firmly it is applied. Where immobilization is required, Hanson recommends using a splint or bandage cast.
For most limb wounds, Hanson suggests applying both a primary and secondary bandage. Once a veterinarian cleans and debrides the wound appropriately, Hanson recommends applying a medicated dressing (such as an acemannan hydrogel or calcium alginate dressing) as the primary bandage to promote autolytic debridement (use of the body’s own enzymes and moisture to liquefy and remove dead tissue). In most cases he will cover this dressing with a thick layer of padding and secure it with a wrap material. If the area requires immobilization he will then apply a secondary bandage, such as a splint or a semisoft bandage cast. Hanson prefers bandage casts over traditional hard casts because he believes they produce fewer complications, such as cast sores, and generally the horse can be sent home rather than having to remain in a hospital for monitoring.
Tendon or ligament injuries Wrapping legs with suspected or diagnosed tendon or ligament injuries has its pros and cons. A wrap can control swelling and provide some support to a leg with what Hanson refers to as a classic mid-tendon bow. “However, if the injury was the result of a bandage bow (caused by a too-tight or inproperly applied wrap), I probably would not use a wrap,” he says.
While these wraps generally do not require a dressing, pay attention to the bandage basics of using padding and applying even tension. Hanson does not believe placing a support wrap on an uninjured leg is necessary.
Julie Dechant, DVM, MS, Dipl. ACVS, ACVECC, associate professor at the University of California, Davis, School of Veterinary Medicine, comments that wraps alone do not give “enough support to provide true protection for tendon injuries. We certainly use (them), but in any severely damaged tendon a bandage alone is not enough support.” In these cases, says Dechant, a splint will most likely be required.
Shipping Owners can apply wraps and/or shipping boots to trailered horses’ legs both to protect the leg from trauma and provide support. Hanson notes that he sees horses arrive at the Auburn teaching hospital in one of two types of shipping wrap: the quilt and wrap type or a more modern shipping boot with Velcro closures. Overall, Hanson prefers the quilt and wrap style, feeling that it provides “support, compression, and protection.”
However, he notes that prefabricated shipping boots can provide more complete protection of the leg, covering the coronary band. “It seems that if someone was really concerned about protection, a combination of the styles might be best,” he says. “Bell boots that cover the coronary band are a nice addition to the (quilt and wrap) bandage if one is concerned with protecting that area from injury.”
Dechant believes that shipping boots are useful during travel, but owners need to be sure the boots fit well so they don’t trip up the horse. She agrees with Hanson that “if you’re only covering the cannon, (the boot or wrap) is not as useful in the trailer where the horse is more likely to step on itself.”
Dechant recommends getting the horse accustomed to having wraps or boots on his legs prior to shipping to avoid trauma from panicking in the confines of the trailer.
Confinement Owners can use standing wraps to minimize limb swelling in a stall-confined horse. Dechant says that “whenever standing wraps are placed, they need to be monitored daily and ideally reset at least once per day.” This way owners and managers can ensure the wrap is not tightening or loosening inappropriately and that no debris has worked its way inside the wrap, where it might cause a sore.
Performance Wraps, bandages, and boots are used in a wide variety of equine performance disciplines for protection and, in some cases, support. Dechant emphasizes the importance of clean, well-fitting, and situationally appropriate equipment. “It’s important to apply and use it in the intended manner,” she says. “Some wraps intended for performance are not meant for horses standing in the stall, where they may not have the same degree of blood flow.” Also, cautions Dechant, many performance wraps have less padding, so owners need to be aware of precise application with appropriate pressure.
Bandaging Demystified
Equine wraps and bandages are sort of like sushi: The menu of supplies is extensive, and everyone has an opinion about the “right way” to combine them. While it is true that inappropriate bandage application can cause as many problems as a well-applied bandage can prevent, following these common sense steps can result in successful bandaging:
1. Keep everyone safe. Preventing human injuries is just as important as treating or preventing equine ones. The person applying the bandage should avoid kneeling or sitting on the ground, says Dechant, and should instead crouch, ready to move out of the way if necessary. She also recommends having a competent handler hold the horse during the process. Bear in mind, too, that some horses initially resent wraps on the hind legs, especially over the hocks, so it’s best to apply these in an open area in case the horse kicks out.
2. Don’t skimp on the padding. “Insufficient padding is going to cause a bandage bow,” says Hanson. Padding should be clean, dry, and in reasonable shape, Dechant adds. Since the idea of the padding is to protect the leg, it’s important to avoid incorporating frayed bits of padding or fill that contains wrinkles or bunches–these can cause pressure points under a bandage.
3. Keep it even under pressure. Remember that “anything directly against the skin should not be applied with any tension at all,” Dechant says. But uneven tension in a bandage’s securing layers also can potentially cause tendon damage. “You want an even distribution of compression along the leg” with this layer, too, says Hanson.
“The key is to apply it firmly but not too tightly,” Dechant adds. If using Vetrap or a similar flexible bandage to secure the padding, she suggests applying enough tension to remove 80% of the wrap’s innate “wrinkles.” She also stresses the importance of overlapping layers of bandage by 50% to avoid having edges of the wrap material dig into the leg.
Using a neatly and tightly rolled bandage will ease application and reduce the need to pull against the horse’s leg and sensitive tendons to tighten the wrap. This will also help ensure the bandage is as smooth against the horse’s leg as possible to avoid uneven pressure.
4. Choose your own direction. Despite barn lore to the contrary, neither sources believe the direction a wrap is applied is critical. “Counterclockwise vs. clockwise is less important than technique,” says Dechant. “I don’t think the tendons care if they’re rolled to the outside or to the inside. However, each layer should be rolled the same (direction).” Hanson agrees with Dechant, noting that he hasn’t come across anything in literature to suggest wrapping in one direction or the other is superior. It is, however, important to be consistent in your technique and not to pull too tightly across the tendons.
5. Keep it clean. Shavings, straw, dirt, and moisture can irrate the skin and increase the risk of a wound becoming infected. Start with clean, dry materials and check the bandage frequently for damage, dirt, or moisture. To seal out debris, Dechant recommends securing the top and bottom of a disposable-type wrap with elastic tape such as Elastikon.
Take-Home Message
Bandages and wraps have numerous uses in the horse world but like many things, they can cause good or ill. Proper materials, application, and devices for the case at hand are all critical to safe and successful bandaging. Equally important is experienced instruction, as the information in this article can in no way replace a veterinarian’s experience and advice.