Pet CPR

The American Red Cross conducts local pet CPR classes for dog and cat owners, pet caretakers, and anyone who is interested in saving the lives of animals.  I participated in this training and I would highly encourage any animal lover to do so..it is time well spent!

Their formula makes the technique simple to remember in the event of an emergency:

  • A is for Airway
  • B is for Breathing
  • C is for Circulation and Chest Compressions

Dr. Becker’s Comments:

The need to resuscitate your beloved pet in an emergency isn’t something most pet owners want to think about.

But it’s better to be safe than sorry, especially when it comes to saving the life of your dog or cat.

The American Red Cross’s ABC’s of Pet CPRdog CPR Nose

A = Airway

If you find your pet unconscious and you don’t know the cause, it’s very likely he has choked on food, a toy, or a foreign object.

Open his mouth and check for a visible obstruction. Try to remove it, but take care not to put your fingers in the mouth of a conscious, panicked dog that might bite you. Instead, try to use a tool to remove the object – pliers or perhaps tweezers.

If you can’t see an obstruction or can’t get to it, use abdominal thrusts or back blows to try to dislodge it.

Place a hand on each side of the animal’s rib cage and apply quick, firm pressure in three to four bursts.

You can also place your pet on his side and strike the side of the ribcage firmly with the palm of your hand three to four times. Repeat these three to four count bursts until hopefully, the object is dislodged.

B = Breathing

If your pet isn’t choking but also isn’t getting air into her lungs, you’ll need to breathe for her.

If the animal is a cat or a small dog with a muzzle (nose and mouth) small enough to fit entirely in your mouth, put your mouth over your pet’s muzzle. Exhale and watch for the chest to rise.

If your dog’s muzzle won’t fit in your mouth, hold her mouth closed, put your mouth over her nose and exhale into her nostrils, again watching for the chest to rise as you breathe air into her lungs.

C = Circulation followed by chest compressions if necessaryDog chest compressions

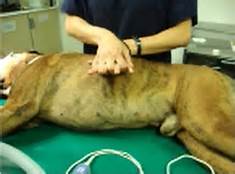
If your pet is unconscious or unresponsive, check for a heartbeat where the elbow of the left front leg contacts the chest. You should only perform chest compressions in the absence of a heartbeat.

If you can’t detect a heartbeat, lay your pet on his right side. For an animal 30 pounds or smaller, place a hand on each side of the ribs where the elbows contact the chest. Squeeze or press gently several times in rapid succession.

For a dog over 30 pounds, you’ll need to cup your hands and place them over the widest area of the chest. Perform rapid chest compressions of one to three inches, depending on the size of the dog.

For an animal under 90 pounds, you’ll need to give one breath as described under B, above, for every five chest compressions so the animal is getting 30 breaths per minute.

For a giant dog 90 pounds or heavier, you’ll need to do one breath for every 10 chest compressions, which will give him 20 breaths per minute.

This is a lot of fast work in a short amount of time. If there’s another person available to help, one of you should do the compressions while the other does the breathing.

Preparation is Priceless

If you want to be prepared for any emergency with your pet, I recommend attendance at a local American Red Cross pet CPR class so you can receive hands-on training using a mannequin.

When you get home to your own pet, you can get familiar with finding her heartbeat and practice placing your hands in the proper position for chest compressions. You don’t want to practice breathing or actual compressions on a healthy animal, however.

You can find other resources on the Red Cross website as well, including dog and cat first aid handbooks.

You can also view an instructional pet CPR video here.

https://youtu.be/0AFrUiRIeVo


Pet CPR

http://www.nbcmiami.com/news/local/Help-My-Pet-Isnt-Breathing-How-To-Administer-CPR-To-Your-Pet-300548141.html

CPR for your Dog

By Dr. Ian Kupkee

April is the American Red Cross’s Pet First Aid Awareness Month. What better time to go over the basics of administering CPR to your pet?

Let me start by saying I hope my readers never need this information. No pet parent wants to think about the possibility that their pet might stop breathing and collapse. Unfortunately, the unthinkable can, and sometimes does, happen. Knowing the basics of CPR can give pet owners the confidence needed to stay calm and work the problem in a life or death situation.

Be Prepared

One of the basic elements of pet CPR is the chest compression. I’ll get to the details in a moment, but before administering chest compressions, you must first be able to locate your pet’s heartbeat. In the spirit of preparedness, it’s a good idea to learn how to do this before an emergency strikes. When your pet is lying on her right side, the heart will be facing upward. Gently pull the front leg back, and feel for the heartbeat near what we would call the armpit. You can also find a pulse at the femoral artery, but the heartbeat is the easiest to find. This activity can easily be incorporated into routine down time with your pet. You can take your time, and your pet will simply think she is getting a massage! The more you practice, the more easily you will be able to locate your pet’s heartbeat. Be prepared. You don’t want to waste time finding it in an emergency situation when every second counts

The ABC’s of CPR

Now let’s imagine a worst-case scenario. Fluffy has collapsed. First, call for help. If you can perform CPR while someone else drives you to the vet, you will greatly improve your pet’s chances. Next, remember your ABC’s. In addition to being very easy to remember, in rescue medicine, ABC is an acronym: Airway Breathing Compression

Check to see if she is breathing by watching for a rise and fall of the chest, and putting your face close to her mouth in an attempt to hear or feel any breaths. If she has indeed stopped breathing, you will need to open the Airway by lining up the head with the neck. Next, open the mouth, gently pull out the tongue, and have a look inside. You’re looking for a foreign body that might be blocking the Airway. If you see one, reach inside and pull it out. Get your hand out of the mouth quickly, as the pet may wake up startled, and frightened animals often bite. If there’s nothing there, you’ll need to start rescue Breathing. Hold the pet’s muzzle closed, put your mouth over the nose of a large dog, or the nose and mouth of a small dog or cat. Give four to five quick rescue Breaths – not too deeply, just enough to make the chest rise. Make sure the chest falls between Breaths. Check for a heartbeat, and if you don’t feel one, you’ll need to start chest Compressions.

Before beginning chest Compressions, be sure Fluffy is lying on her right side, so that the heart faces upward. Place the heel of your hand over the heart, lock your hands together, straighten the arms and give 30 rapid chest Compressions. For a large dog, Compressions should go down about two to three inches. For small dogs and cats, a half inch to full inch is an adequate Compression. After your 30 Compressions give two more rescue breaths, then resume chest compressions. This is called a cycle, and is defined by 30 compressions, followed by two rescue breaths. After four cycles – or about one minute – check again for a heartbeat and signs of independant breathing. If you can’t find either, keep going – 30 compressions, two rescue breaths.

You can continue for as long as 20 minutes, but by then, you really need to be at your vet’s office or an emergency clinic if you want to give your pet the best chance of survival.

This truncated recap can be printed out and placed in your pet’s first aid kit – Know how to find your pet’s heartbeat in advance. – Know your ABC’s: Airway, Breathing, Compression. – In an emergency situation, call for help and get someone to drive you to the vet. -Lie your pet on the right side. -Quickly check for heartbeat and breathing -Align the head and neck -Pull the tongue out -Look inside for a foreign body -Close the muzzle, give 4-5 rescue breaths -Check for signs of life -Give 30 chest compressions -Give two rescue breaths -Repeat three more times -Check for signs of life -Keep going if needed

Remember, your can really increase your pet’s chances if you do this on the way to the vet. Even if you are able to revive your pet at home, get her to the vet for follow up care and observation. Diagnostics performed in the wake of an emergency can give your veterinarian an idea as to what caused the crisis in the first place. There is nothing quite like the rush one gets from successfully administering CPR. That being said, you’re not likely to want to do it again anytime soon.

http://www.nbcmiami.com/news/local/Help-My-Pet-Isnt-Breathing-How-To-Administer-CPR-To-Your-Pet-300548141.html

dog with vet
dog with vet