As a horse lover I have provided many supplements to my various horses through my 42 years of owning and loving horses. Obviously many of us horse lovers want the very best for our beloved equine friends and we turn to supplements to keep them comfortable and happy. I have used hoof supplements, joint supplements, blood enhancers such as Red Cell and many more. Ah, what we do for our pets! Read all about supplements by clicking on the link. Enjoy and learn!
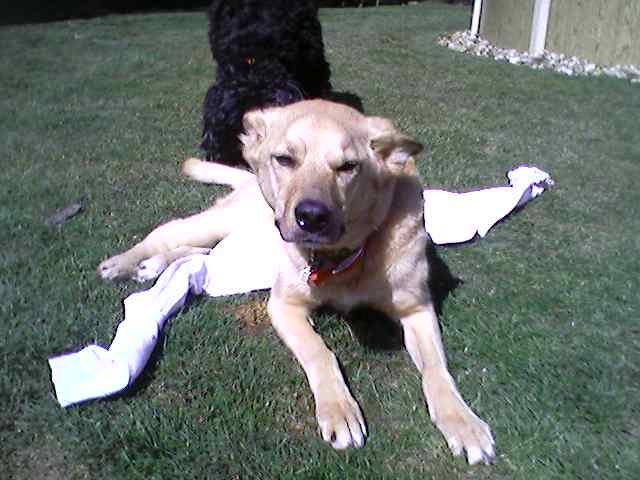
The show didn’t cover poop eating, which would have been perfect in this segment, so I’ll write about it here. Rodrigo has a history of eating his poop – not the poop of other dogs, just his own. This is related to his GI issues and adding a quality digestive supplement is what helped him.
When I was researching adding pancreas to his diet, I stumbled across a condition in dogs called EPI or Exocrine Pancreatic Insufficiency, In this condition, the pancreas, which is the organ that regulates blood sugar level and produces digestive enzymes, isn’t working correctly resulting in symptoms that I was seeing in my dog.
I imagine Dr. Courtney and Dr. Olivieri cringing if they read that I used Google to diagnose my dog. I talk to my vet too! I promise!
I give my dog a pancreas supplement called Bio Case Plus which has stopped the EPI symptoms, allowed him to produce raw fed poops finally, and stopped the poop ending.
“Pica is a medical issue referring to a dog’s craving of a non-food item and the subsequent eating of said item. Coprophagia, meanwhile, is the eating and ingesting of feces. Generally, neither of these conditions are the result of an underlying disease, however, it can occur.” Source: PetMD.com
My other dogs don’t eat random things. My cat went through a period when he would eat the carpet; I bought him a few more cat toys and he stopped eating the carpet. Now we have a few repairs to make around the house.
Why Dogs Eat Crazy Things
Hunger
Boredom
Anxiety
Stress
Medical Conditions that Cause Pica
Anemia
Diabetes
GI Issues, like IBD (inflammatory bowel disease)
Increased hunger
Intestinal parasites
Malnutrition
Neurological disease
Vitamin deficiency
Thyroid disease
Signs of a Blockage in Dogs
Vomiting
Loss of appetite
Diarrhea and/or tarry stools
Difficulty pooping or inability to poop
Lethargy
Burping
If you think your dog has a blockage, call your vet immediately. On this episode, Dr. Courtney spoke with a woman who’s dog ate glue, which expanded in his gut and created a life-threatening blockage that required surgery to remove.
Sadly, feline diabetes rates have skyrocketed over the last decade. The disease is most often seen in overweight and obese adult cats who are fed biologically inappropriate dry food diets and get little to no exercise. However, this is not always the case!
Feline diabetes is almost 100 percent preventable, so for the sake of your precious kitty, I hope you’ll give serious consideration to the importance of nutrition, exercise and maintaining your pet at a healthy weight. Tips for preventing diabetes in your cat:
Avoid dry food. All dry foods require starch (carbs) for manufacturing. Avoid canned cat foods containing grains (e.g., corn, wheat, rice, soy, millet, quinoa). Also avoid starchy “grain-free” high calorie, high-glycemic diets containing potatoes, chickpeas, peas or tapioca.
All the carbs (starch) in your cat’s food — which can be as much as 80 percent of the contents — break down into sugar. Excess sugar can result in diabetes.
Help your cat stay trim by feeding a portion controlled, moisture-rich, balanced and species-appropriate diet consisting of a variety of unadulterated protein sources and healthy fats, and specific nutritional supplements as necessary.
See to it that your kitty gets a minimum of 20 minutes of daily aerobic exercise.
Don’t allow your cat to be over-vaccinated. There’s a growing body of research that connects autoimmune disorders to diabetes in dogs, and the same may be true for cats. If your kitty has had vaccines in the past, there’s a high likelihood her immunity will last a lifetime.
Each time a fully immunized pet receives a repetitive set of vaccines, it increases the risk of overstimulating the immune system.
If you’re concerned about your cat’s disease risk, I recommend you find a veterinarian who runs titer tests to measure antibody response from previous vaccinations. Titer results will tell you whether vaccination is necessary, and for which specific diseases.
One of my friends was able to turn around the diabetes in her cat with diet changes—here is her story:
Case Study- Bonnie’s (Diane’s friend) Cat
Caressa is Bonnie’s cat who was diagnosed with diabetes. Bonnie fed Caressa only wet cat food with the highest amount of meat and the lowest grains and veggies. She chose Fancy Feast Classic and she stayed away from the fish variety. The cat was fed only two times a day -morning and night – as close to the same time as possible.
Bonnie feels that if you catch the diabetes early enough sometimes just switching the cat to only moist food will bring them back to a normal blood glucose reading. But with Caressa she had very high numbers and had to be on insulin. She followed her vet’s tight regulation protocol. With this protocol you draw blood and test it with a glucometer and then determine the amount of insulin to give your cat. This was done twice a day, morning and evening.
It took a while but in time we no longer needed to give Caressa any insulin and her body stayed in a good range. She remained diabetes free for almost 6 1/2 years before she ended up with hyperthyroid. One thing that is super important is that if your cat is ever diagnosed with diabetes you must always feed her the moist food, giving them any form of dry food can send them right back into the diabetic state.
Thank you, Bonnie, for sharing your experience with Caressa’s diabetes. Caressa has transitioned into spirit but she was a sweet, darling girl and I was so glad you were able to keep her comfortable in your last few years together.
Dr. Shea Cox of Bridge Veterinary Services in northern California, writing for The Bark, offers a do-it-yourself (DIY) dog checkup in seven simple steps, to which I added a few notes of my own:1Do-It-Yourself At-Home Dog Checkup
Dr. Shea Cox of Bridge Veterinary Services in northern California, writing for The Bark, offers a do-it-yourself (DIY) dog checkup in seven simple steps, to which I added a few notes of my own:1
Your dog’s temperature should be between 100 and 102.5 degrees F. Take her temp using a digital rectal thermometer by lubricating the end with a bit of coconut oil and gently inserting it about 1 inch into the rectum of a small dog, and about 2 inches if your dog is larger. If it doesn’t slide in easily, don’t force it.
You can check your dog’s pulse by locating the femoral artery inside her thigh. Use your fingers to gently feel for the roll of the artery and a pulse. Then just as you would when taking your own pulse, count the number of beats over a 15-second period and multiply that number by 4.
Dogs’ heart rates cover a wide range, but 80 to 120 beats per minute is considered normal for most dogs. Larger breeds, especially canine athletes, sporting and working dogs, tend to have slower pulses than small breeds and puppies.
Starting at your dog’s head, take a careful look at his nose, which should be smooth and soft to the touch, and clean. (It doesn’t necessarily have to be cool or moist, by the way. Healthy dogs sometimes have dry, warm noses.)
Next, check his eyes, which should be bright, moist and clear, with little or no discharge. The pupils should be the same size, and the whites should be white (not yellow, pink or red), with just a few visible blood vessels. His ears should be clean, dry and odorless (or nearly).
His gums should be a healthy pink color and moist. There should be no lesions or swelling in his mouth, and no bad breath. His teeth should be free of tartar and plaque, the tongue clear and the roof of the mouth clean and free from debris.
Moving down to your dog’s chest, notice how he breathes. His chest should move in and out without effort, and the breaths should be rhythmic. Unless he’s panting or is a flat-faced (brachycephalic) breed, his breathing shouldn’t be audible.
The normal resting respiration rate for dogs is 15 to 30 breaths per minute. If your dog is sleeping, his rate will be closer to 15 breaths per minute. If he’s excited or anxious, it will be on the higher end of the range. Small dogs tend to have faster breathing while at rest than larger dogs.
Next, take a careful look at your dog’s skin, which is actually the largest organ of her body and can give a pretty accurate picture of her overall health. Her skin should be soft and smooth with no lesions.
There should be no redness or rough spots, and very little odor. Her coat should be soft, shiny and smooth (unless she’s a wirehaired breed).
Check to insure your dog is well-hydrated. You can do this by gently lifting the skin of her neck or back into a “tent” and releasing it. It should quickly return to its normal position. If it returns slowly or remains in the shape of a tent, she may need more drinking water or moisture in her diet.
Now to the torso. Put your hands just behind her ribs and gently press on her tummy. If she’s just had a meal, you may feel a fullness on the left side of her stomach just under the ribs, which is normal.
Evaluate her muscle tone and weight. If you feel she’s carrying extra weight, you’ll want to address the issue with more exercise and feeding a nutritionally balanced, species-appropriate diet.
Check for heat and swelling over her body, and test the range of motion of the joints, which should move freely, without resistance or difficulty.
Moving your hands over her body toward the rear, feel for lumps, bumps and masses; signs of discomfort; or distention of the belly that may warrant further investigation by your veterinarian.
If you notice an unusual lump, bump or wart during your DIY exam and you don’t think it warrants immediate attention, it’s a good idea to start a body chart for your pet. Draw a simple diagram of her body and note whatever you’ve found in the appropriate place on the drawing.
Be sure to include exactly where it was found, when you found it, how big it is and whether you’ve noticed it changing. If you notice a lump that has grown bigger or changed appearance a day or two later, make an appointment with your vet.
Finally, examine her toes, nails and the pads of her feet. There should be no debris between the toes, the nails should be clipped to a comfortable length and the pads of her feet should contain no cuts or sores.
I need Diane’s lotion bar please!
If you examine your dog regularly, you’ll quickly become familiar with what’s normal and what’s not. Performing regular at-home exams is a simple and very effective way for you to keep a close eye on your canine companion’s health.
When our pets are sick, we want to do everything possible to make them feel better. Sometimes that means giving them the same medications we use to treat our own strains, sprains, and symptoms.
While some of the pills and potions in our medicine cabinets are safe for pets, it’s imperative to consult your veterinarian before administering any new medication, says Dr. Cathy Meeks, a board-certified internal medicine specialist and a Group Medical Director at BluePearl Veterinary Partners in Tampa, Florida.
“We have to remember the size of our pets compared to us,” she says. “Even with the medications that are safe for pets, the dosages are drastically different.” And some drugs are flat out dangerous for pets at even the tiniest doses.
Here are nine “human medicines” that, when dosed properly, are vet-approved to help your pet feel better faster.
Pepcid
Uses: Helps reduce stomach acid and protect the stomach lining
Pepcid can be used to treat or prevent ulcers and inflammation caused by stomach acid in pets and humans. Some pet owners also administer it to pets to help with vomiting. But this isn’t always a sure-fire plan, Meeks says. If your pet is vomiting and uninterested in her food, it could be a sign of a bigger problem. Consult your veterinarian if symptoms continue, she advises.
While Pepcid is relatively safe for pets, in dogs it may cause side effects such as loss of appetite and drowsiness, says Dr. Carol Osborne, an integrative veterinarian and author of the books “Naturally Healthy Cats” and “Naturally Healthy Dogs.”
“Signs of overdose include vomiting, increased heart rate, red mouth and ears, pale gums, restlessness, low blood pressure, and collapse,” Osborne says.
Prilosec
Uses: Helps reduce stomach acid
Prilosec is another acid-reducing medication that’s generally safe for pets, Osborne says. But it’s not without its side effects, which may include decreased appetite, vomiting, diarrhea, flatulence, and changes in urination or behavior
Lomotil
Uses: Antidiarrheal and cough reliever
While Lomotil can treat diarrhea, it’s most often used as a cough suppressant in dogs. Smaller toy breeds are predisposed to collapsing trachea, a condition whose symptoms include a persistent cough, Meeks says. Lomotil can help dry out the air passages and reduce the spasms that cause coughing.
Lomotil is a relatively safe drug, but since it’s also an antidiarrheal, side effects may include constipation in pets and confusion in pet owners, she says.
“Whenever I prescribe it, people will call back and say, ‘I think you gave us the wrong medicine,’” Meeks says.
Benadryl
Uses: Antihistamine and mild sedative
Just like with humans, Benadryl can be used to help treat acute allergic reactions, Osborne says. It can also serve as a mild sedative for pets who are stressed out by road trips or fireworks and as a preventative for motion sickness.
Side effects include dry mouth, decreased urination, vomiting, and loss of appetite, Osborne says. It may also cause hyperexcitability in cats.
To learn more about giving Benadryl to dogs, watch this video. By Jessica Vogelsang, DVM
Benadryl, also known by its generic name diphenhydramine, is one of the few over-the-counter drugs that veterinarians routinely have owners administer at home. While it is generally well tolerated and has a wide safety margin, there are a few things owners should keep in mind before dosing it at home:
1. What is Benadryl used for?
Benadryl is an antihistamine, blocking the H-1 receptors on smooth muscle and blood vessels. Some of its most common indications are the treatment of environmental allergies, allergic reactions to insect bites or stings, and pre-treatment of vaccine reactions. It also has some efficacy in the prevention of motion sickness in dogs and as a mild sedative.
2. When should I not use Benadryl?
Benadryl is contraindicated with certain conditions, such as pets with glaucoma, high blood pressure, and cardiovascular disease. It’s always best to contact your veterinarian for guidance before administering any medication to your pet, including Benadryl.
How much Benadryl should I give?
The standard dosage for oral Benadryl is 1 mg per pound of body weight, given 2-3 times a day. Most drug store diphenhydramine tablets are 25 mg, which is the size used for a 25 pound dog. Always double check the dosage before giving an over the counter medication. In addition, many formulations are combined with other medications such as Tylenol so make sure Benadryl tablets contain only diphenhydramine.
When should I contact my veterinarian?
Oral Benadryl is considered a mild to moderately effective antihistamine. If a pet is having an acute allergic reaction with facial swelling or difficulty breathing, skip the oral medications and go straight to the vet. Many allergic diseases require a combination of medications and treatment of underlying infections; if your pet is not responding to the medication, talk to your vet for other options.
Saline Eye and Nose Drops
Uses: Rinses, moisturizes, and relieves congestion
Meeks says she uses children’s nose drops to help clear the upper airways of congested cats. Saline eye drops can also help relieve mild conjunctivitis and other eye irritations.
Dramamine
Uses: Relieves motion sickness and vertigo
Pets get dizzy too, Meeks says. Properly dosed Dramamine can help relieve the symptoms of carsickness and vertigo. The most common side effect is drowsiness, she says.
Glucosamine, Chondroitin, and Omega-3 Fatty Acids
Uses: Improves joint health
These supplements can be administered to older or injured animals to help alleviate the pain caused by arthritis and other joint problems, Meeks says. There are little, if any, side effects, she says.
Hydrogen Peroxide
Uses: Emetic
Everyone’s favorite stinging antiseptic can also help induce vomiting in pets who have swallowed something they’re not supposed to, say a dog who just ate five chocolate bars. But call your vet first. You don’t always want to induce vomiting when a pet has eaten something dangerous. Batteries, among many other examples.
Most of us are familiar with pain scoring. It’s when a doctor or nurse asks us to rate the pain we’re experiencing with a number, for example, 0 to 10, with 0 indicating almost no pain, and 10 signifying excruciating pain.
As an animal communicator who just spent a lot of time with doctors, I accidentally asked a animal client what their pain level was on a scale of 1-10. When the pet said “what??” I realized that I was parroting the phrase I’ve been hearing over and over but for our pets it’s not that easy. You see, your pet is not lineal so they cannot tell me their level of pain based on a scale. I said DUHHH to myself and vowed to stop seeing doctors so much! Here is some info on pain score levels:
“… [A] pain score is a subjective number that gauges a patient’s pain intensity based on behavioral and physiological parameters,” says Dr. Phil Zeltzman, writing for Veterinary Practice News.
“Several pain scales are available, such as the Visual Analog Scale, the Colorado Pain Scale and the Glasgow Composite Pain Scale.”1
The Colorado Pain Scale uses just five numbers (0 to 4), making it quick and easy to use. Unfortunately, pain scoring is almost exclusively a human medicine tool. The veterinary community hasn’t yet “embraced the concept,” according to Zeltzman, and I’ve certainly seen evidence of this myself.
I still regularly have pet owners tell me their vets won’t administer pain medications after extensive surgeries or accidents, despite some clients begging for them. This breaks my heart for the animal having to suffer unnecessarily and enrages me that doctors who take an oath to relieve suffering are failing to do so.
Zeltzman, a board-certified veterinary surgeon with a traveling surgery practice covering eastern Pennsylvania and western New Jersey, urges his veterinary colleagues to get onboard with pain scoring.
“With practice, attributing a pain score to cats and dogs will become second nature to you and your team,” he says. “It shouldn’t be much more complicated than attributing a body condition score to a patient.”2
Evaluating Patients Who Can’t Tell Us How Much Pain They’re In
In veterinary medicine, our patients can’t tell us in words how much they’re hurting, so pain scoring must be done primarily through observation. It can be used not only with animals who’ve had surgery, but also any pet dealing with an injury or illness.
Since every animal is an individual with a specific pain threshold, to use pain scoring effectively, we must observe the patient before painkillers are given and before any procedure is attempted, no matter how minor (e.g., a blood draw).
We also need to apply some science to the art of observation when determining a pet’s pain score. We need to know average pain levels for the condition the animal has or the surgery about to be performed, and factor those into the equation.
This is necessary because many dogs, and especially cats are stoic even when in significant pain.
“We all have encountered a young Lab hit by a car,” says Zeltzman. “Despite extensive open wounds and fractured bones, he might be wagging his tail.
The same applies to cats that may be purring despite significant trauma. Therefore, expected pain levels for a particular surgery or condition are taken into account when we give a pain score.”
Benefits of Pain Scoring Veterinary Patients
Dr. Zeltzman explains four benefits for veterinarians and their staffs who measure each patient’s pain level:
Pain scoring increases the awareness of everyone on the vet staff who is caring for the patient. It also allows for customizing and modification of pain management protocols based on the individual pet and the procedure being performed.
“[Using the Colorado Pain Scale] a pain score of 0 or 1 should be our goal,” says Zeltzman. “A score of 2, 3 or 4 should lead you to immediately reassess the analgesic plan and better understand what is happening to your patient.”
Zeltzman believes any veterinary clinic can benefit from pain-scoring every animal, just as all patients are weighed, their temperature, pulse and respiration are measured, and their body condition is scored
Pain scores are not static — they change over time depending on a wide range of factors, including patient characteristics, veterinary procedures performed, pain medication and dose timing, and others. Pain scores in hospitalized patients should be taken every few hours.
Zeltzman suggests veterinary staffs incorporate pain scoring as the “fourth vital sign” following temperature, pulse and respiration (TPR) measures.
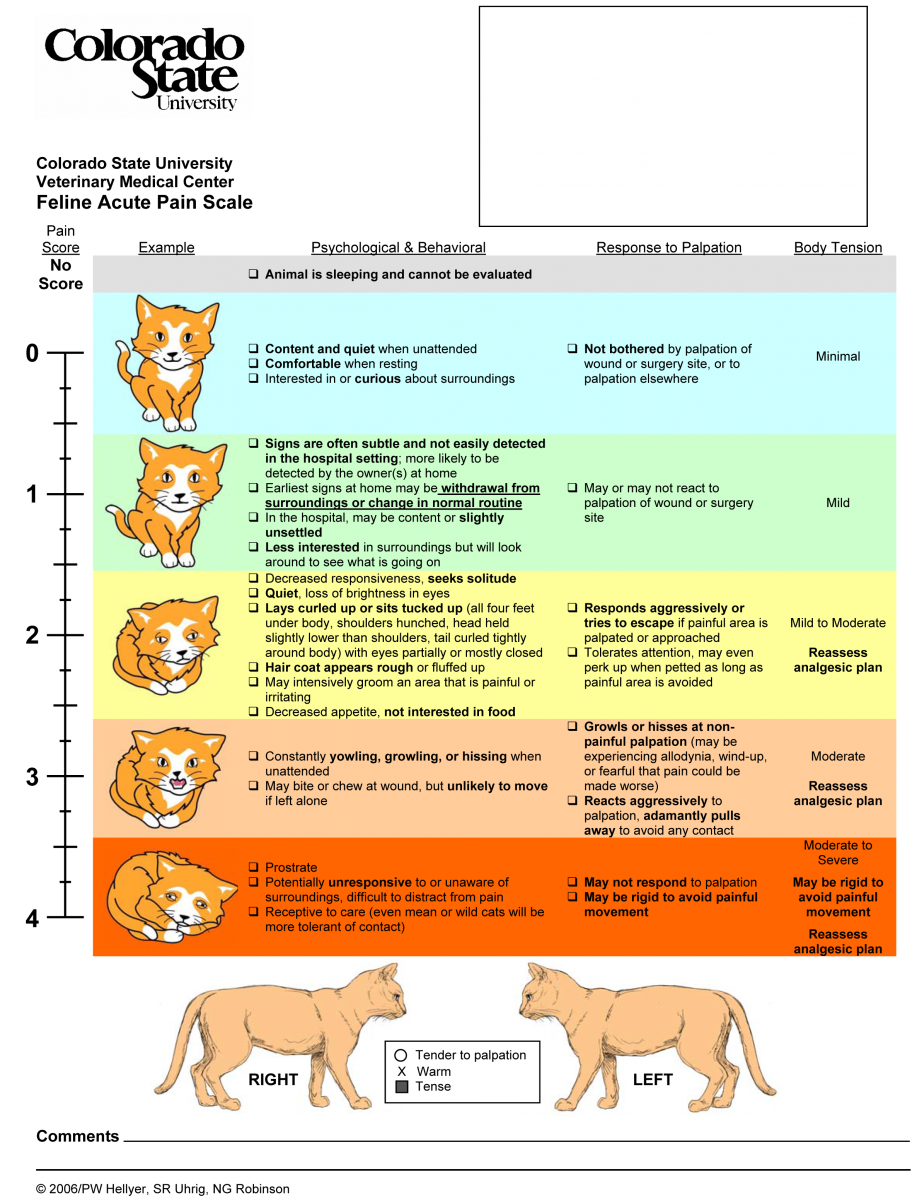
Colorado State University Pain Scales
Pain scales such as Colorado State University’s (CSU) are obviously intended for use by veterinarians and their staffs, but they can also be helpful for pet parents who want to learn what signs to look for to determine if their dog or cat might be in pain.
✓ Pain score: 0
No pain present. The patient is happy, acts normally, moves comfortably, has a normal appetite and (if applicable) does not bother the surgery site. TPR is normal.
✓ Pain score: 1
Mild pain present. This is usually displayed by a slight limp, difficulty getting up or down or a slight increase in TPR.
The patient is eating, tail wagging or purring and not depressed.
✓ Pain score: 2
Moderate pain present. The patient shows sensitivity and may lick or chew at the surgical site or wound.
The patient may vocalize, may refuse to eat and may seem depressed, and has slow, shallow respirations.
✓ Pain score: 3
Severe pain present. Signs include depression, reluctance to move and sensitivity at the surgical site or wound.
The patient will usually not eat, may vocalize and may lie down but not sleep.
✓ Pain score: 4
Excruciating pain present. The patient shows all the signs described with a pain score of 3, in addition to intermittent panting, increased TPR — even at rest — constant vocalizing, profound depression, dilated pupils, aggressiveness and deep breathing.
To view the full detailed CSU pain scales, which include rough drawings of how your dog or cat might appear with a pain score of 0, 1, etc.: Canine Pain Scale, Feline Pain Scale.
What to Do If Your Pet Seems to Be in Pain
Healing Hands using Healing Touch for Animals or Reiki
How your animal companion’s pain is managed depends on what’s causing it, so it’s crucially important to make an appointment with your veterinarian for a thorough exam. Once your veterinarian has evaluated your pet and depending on the root cause of his discomfort, there are a number of integrative therapies that blend nicely to reduce the amount of medications needed to manage pain, including:
There are also some newer therapies I’ve used with good success, including the Assisi Loop, a form of pulsed electromagnetic field therapy. In addition, there are a number of beneficial supplements you can add to your pet’s diet, again depending on his diagnosis and treatment protocol.
For information on pain management with healing touch for animals, acupressure or essential oils please contact Diane Weinmann at dianefortheloveofanimals@yahoo.com or check out her website at www.theloveofanimals.com
If you have a four-legged family member at home, you know that the occasional bout of diarrhea just goes with the territory. It’s not really a matter of if your pet will have diarrhea, but when. Because at some point, it’s going to happen!
Knowing what to expect when your pet has loose stools — and how to manage it when it happens — is good information to have, preferably before you need it.
Causes of Diarrhea
There are several reasons dogs and cats get diarrhea, but the most common cause by far is dietary indiscretion, which means your pet ate something he shouldn’t have and his body wants to get rid of it right away. This is probably why the occasional bout of diarrhea is more a problem for dogs than cats.
Cats tend to throw up, whereas dogs tend to have lower GI (gastrointestinal) problems and loose stools. Also, many dogs are indiscriminate eaters, whereas cats are typically more selective about what they put in their mouths.
If your dog eats a stick or a chew toy, diarrhea or intermittent loose stools can be the result. If your kitty swallows a rubber band, though it may not cause a GI blockage, it can still cause diarrhea.
A sudden change in diet can also cause diarrhea, especially in pets who are fed the same food day in and day out for a long period of time. It’s one of the reasons I recommend variety in your pet’s diet. If your dog or cat has a strong, resilient GI tract, he should be able to eat different foods regularly and not have diarrhea.
Just as your body is designed to eat different foods every day and not have diarrhea, so is your pet’s. If you feed your dog or cat the same food day after day, month after month, year in and year out, then suddenly switch to a new diet, a case of diarrhea is just about guaranteed.
It’s not the fault of the different food — it’s because your pet’s gut has been conditioned to process only one type of food, which is not ideal, nutritionally or physiologically.
Transitioning Your Pet to a Varied Diet
The goal is to diversify your pet’s diet to include a variety of foods with different nutrient contents, which ultimately fosters a diversified gut microbiome, and makes the digestive system strong and resilient.
Up to 80 percent of your pet’s immune system is located within the GI tract, so the more you focus on creating good gut health, the healthier your pet will be overall.
If you want to feed your pet a different food, you have to make the transition very slowly. I can’t tell you the number of times I’ve had clients throw out their old pet food and switch their dog or cat immediately to a new food.
They often end up at the emergency animal hospital with a debilitated animal who’s dealing with a terrible case of diarrhea due to the sudden dietary change.
A slow dietary transition means days to weeks for most dogs, and often weeks to months for cats. I recommend you start by feeding 10 percent new food blended with 90 percent old food for several days. Watch your pet’s stool and if all seems well, move to 20 percent new/80 percent old.
Keep watching for stool changes and if none occur, move to 30 percent new food and 70 percent old, and so on, until you’re feeding only the new diet. The process should be slow enough that no bowel changes occur.
Other Causes of Diarrhea
Food allergies or sensitivities are another common cause of diarrhea for both dogs and cats. What many veterinarians call inflammatory bowel disease (IBD) or irritable bowel syndrome (IBS) is actually a response to something in the diet. Both IBD and IBS can cause intermittent loose stools or diarrhea.
Pancreatitis, which is inflammation of the pancreas, and feline hyperthyroidism have diarrhea as a symptom.
Viral and bacterial infections in the gastrointestinal tract can cause diarrhea. And parasites like giardia are another culprit. This microscopic parasite causes intermittent diarrhea that can be difficult to diagnose.
Let’s say your otherwise healthy dog or cat develops intermittent loose stools seemingly out of the blue. You didn’t switch her diet, she didn’t eat anything she shouldn’t have — she just has loose stools for a few days. About the time you think you should call your vet, the stool firms up on its own.
You assume all is well — until another bout of diarrhea occurs days or weeks later. At this point, it’s time to ask your veterinarian to check for a giardia infection.
Stress is another cause of loose stools in some pets. Stress-induced diarrhea occurs when peristalsis, which is the wave-like motion of the GI tract that moves food through the intestines, is increased due to anxiety or stress.
Diarrhea Symptoms
Diarrhea symptoms can be quite varied. Of course, frequency, urgency, and loose watery stools are the classic signs, but so is straining. Many pet guardians mistake constipation for diarrhea because they see kitty hunched up in her litterbox, or the dog hunched up outside, and nothing much seems to be happening.
What looks like constipation in this instance is really just another sign the pet is having a bout of diarrhea. Diarrhea upsets the normal rhythmic contractions and sensations of the GI tract, causing your dog or kitty to feel the constant need to eliminate. This is why she’s hunching and straining.
If your indoor cat is having diarrhea, it’s easy to know — just check the litterbox. Outdoor cats and dogs can be a bit more difficult to diagnose, so if you see your dog or kitty hunched up outside, check around for loose, brown or watery stools. If you find any, your pet is more likely to have diarrhea than constipation.
Other symptoms that can go hand-in-hand with diarrhea include lethargy, loss of appetite, fever and dehydration. Typically young, healthy pets have a single episode of loose stool or diarrhea, and it’s done. However, if your dog or cat is having chronic bouts of diarrhea, she runs the risk of becoming debilitated and ill.
Puppies and kittens, small adult pets, and older animals are at high risk of becoming dehydrated from even a single episode of diarrhea. If your dog or cat seems fine and healthy after a bout of diarrhea, it’s safe to simply keep a careful eye on her. But if you notice any lethargy, or a fever or change in behavior, you should call your veterinarian.
If your pet seems fine otherwise but is having recurring episodes of diarrhea that don’t seem to be resolving, or episodes that last more than three days, it’s also time to call the vet for an appointment. If your dog or cat is passing blood in her stool or if you notice any weakness or other signs of debilitation along with diarrhea, it’s important to get her to the vet immediately.
Treating a Pet With Diarrhea at Home
If your dog or cat is otherwise healthy and his behavior is normal, my recommendation is to withhold food — not water, just food — for 12 hours. A short-term fast gives the GI tract a chance to rest, repair and restore itself. Tissues can only heal when they’re resting.
Follow the 12-hour food fast with a bland diet. I recommend cooked, fat-free ground turkey and 100 percent canned pumpkin. If canned pumpkin isn’t available, you can use fresh, steamed pumpkin. If you can’t use either one of those, you can use cooked sweet potato or even cooked white potato.
Many veterinarians still recommend a bland diet of ground beef and rice. I don’t agree. Even the leanest ground beef is high in fat, which can worsen GI upset, and boiling it doesn’t substantially decrease the fat content. That’s why I recommend fat-free meat for bland diets. You can easily find fat-free ground turkey or turkey breast in most grocery stores.
Rice is a very starchy carbohydrate that tends to ferment in the GI tract and also provides a food source for opportunistic bacteria. Rice also often zips right through the digestive system and leaves your pet’s body looking just like it did going in. This tells you it hasn’t provided much in the way of calories or nutrition.
Canned 100 percent pumpkin provides about 80 calories and 7 grams of soluble fiber per cup, compared to 1.2 grams of fiber in a cup of cooked white rice. The soluble fiber (the type that dissolves in water to form a viscous gel) in pumpkin coats and soothes the GI tract.
Soluble fiber also delays gastric emptying, slowing down GI transit times and helping to reverse the effects of increased peristalsis. When animals have diarrhea, they can lose important electrolytes, including potassium, which puts them at risk of dehydration. Hypokalemia, or low potassium levels, can result in cramping, fatigue, weakness and heart rate irregularities.
Pumpkin happens to be an excellent source of potassium, with 505 milligrams of naturally occurring potassium per cup. Pumpkin is also safer for diabetic pets than rice. And most animals love it, including cats.
Since dogs and cats don’t have a nutritional requirement for grain, feeding a pro-inflammatory food like rice when they’re already having GI upset is counter-intuitive. There’s also the issue of arsenic in rice. Mix the turkey and pumpkin, 50/50, and feed it to your pet until the diarrhea resolves. If it doesn’t clear up in about three days on a bland diet, it’s time to call your veterinarian.
Additional Treatment Suggestions
I also recommend keeping some slippery elm on hand. Slippery elm is a neutral fiber source that works really well to ease episodes of diarrhea. I call it “nature’s Pepto-Bismol” because it reduces GI inflammation and acts as a non-irritating source of fiber to bulk up the stool and slow down GI transit time.
Give your dog or cat about a half a teaspoon or a capsule for each 10 pounds of body weight with every bland meal. I also recommend adding in a good-quality probiotic once the stool starts to firm up. In addition to slippery elm and probiotics, many pet owners have good luck with herbs such as peppermint, fennel or chamomile. These are especially helpful for the cramping and other uncomfortable GI symptoms that come with diarrhea.
There are several homeopathic remedies that can be very beneficial for intermittent diarrhea depending on your pet’s specific symptoms, including nux vomica, veratrum, podophyllum, arsenicum album and china.
When to See the Veterinarian
If your pet’s diarrhea isn’t resolving or keeps returning, I recommend you collect a quarter-size bit of poop on, for example, a stiff piece of cardboard, and slip it into a plastic baggie. Otherwise, your veterinarian may have to manually extract a sample, which will make your already uncomfortable pet that much more so.
Your vet will probably do bloodwork in addition to evaluating the stool to determine if there’s infection present. He or she should also treat your pet for dehydration if necessary, with IV (intravenous) or SQ (subcutaneous) fluids. Two fecal tests should be performed. One test checks for parasite antigens and/or eggs, and the other checks for bacterial or viral agents that cause diarrhea.
Prevention Tips
If your pet is a puppy, chances are he’s getting into grass, mulch, sticks, rocks, dirt and who knows what else every time you take him outside. Close supervision of very young dogs is important. If you have a cat who is obsessed with your houseplants, again, supervision is essential.
Puppies naturally harbor internal parasites. If the mother dog had parasites during pregnancy, the litter will also have parasites. One of my pet peeves with my traditional veterinary colleagues is they often give a universal dewormer to every puppy they see.
The problem is, there’s no such thing as a universal dewormer. Roundworm/hookworm, tapeworm, coccidia and giardia all require different dewormers. Don’t let your veterinarian try to convince you that one universal dewormer will get rid of all of those parasites. It’s not true.
Guessing is bad medicine. I recommend asking your veterinarian what specific parasite your dog or cat has before giving your pet what could be an unnecessary drug. Keep potentially toxic houseplants out of the reach of your pet. It’s important that your house is puppy- and kitten-proof.
You should go through each room and make sure there’s nothing potentially deadly your pet could get into. Young animals are naturally inquisitive about their environment, and they investigate with their mouths.
Your new puppy or kitten provides the very best incentive for keeping a clean, orderly home. It’s also important to pick up any food you drop on the floor. Although digestive disturbances come with the territory of pet ownership, a bland diet and a soothing herbal remedy like slippery elm will usually do the trick in managing the occasional bout of diarrhea in dogs and cats.
I love birds.I love the way they look with the beautiful colors and patterns on their feathers, how they glide through the air and above all else, their delightful songs.Since it’s the winter season in the area I live in, I have noticed lots of bird nests in the bare trees.I wondered if I would ever be able to distinguish who were the occupants.I started searching the internet and found this wonderful article about bird nests.I hope you enjoy it as much as I did.
Just as different houses have different architectural styles to meet different residents’ needs – Victorian, ranch, colonial, Mediterranean, etc. – birds also use different types of nests to best suit their needs. Learning the different styles of nests can help birders better appreciate birds’ engineering ingenuity, and nest types can be a great clue for proper bird identification.
Why Birds Build Nests
No matter what style a bird uses, all nests serve the same purpose – to protect the eggs and hatchlings.
There are different ways nests do this, including:
Cushioning: Many nests are lined with soft plant fibers, animal fur, fine grasses, moss and similar materials that provide cushioning for the eggs, protecting them even when a brooding adult may be moving around on top of the nest. Most nests also have a degree of flexibility in order to continue protecting growing hatchlings without breaking or collapsing.
Shelter: Nests help shade and protect eggs and chicks from poor weather. Some birds do this by creating nests that include roofs or overhangs, but more often the nests is positioned in a sheltered location out of the wind and protected from the worst of hot summer sun or drenching rains.
Camouflage: Eggs and chicks are exceptionally vulnerable, and most nests are constructed to help keep the birds and eggs hidden from predators. Birds may do this by building their nest in a hidden location or by using materials to help conceal the nest, such as adding bits of bark, lichen or other materials to the outside of the nest as camouflage.
In some cases, nests also help attract mates, and some birds build especially elaborate nests or may start several nests in different locations to better appeal to a mate. Once the partnership is formed, the nest construction will be finished and the eggs laid.
Bird Nest Designs
Birds can create many different types of nests.
While the same species will always create the same sort of nest structure – birds can’t change their minds and invent new nests – there is great variety among nests types.
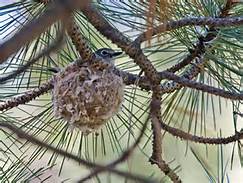
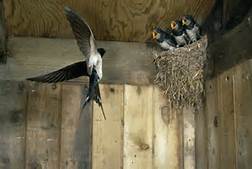
Cup: A simple cup-shaped nest is the most familiar, most common nest type. The overall size, dimensions and depth of the cup may differ, and some birds build distinct inner and outer layers of the cup. Cups are often positioned along tree branches or in tree forks, or may be nestled on ledges or in any number of unique places.Birds That Build Cup Nests: Barn swallows, ruby-throated hummingbirds, yellow warblers, American robins and many different passerines.
Scrape: A basic scrape is a shallow depression on the ground without much nesting material, though it may have a light lining of down, pebbles, weeds or other debris. Scrapes are popular nest types for terrestrial birds or birds that prefer open habitats that lack abundant trees, such as shorebirds or tundra species.Birds That Build Scrape Nests: Common ostrich, killdeer, American avocet, Arctic tern and many shorebirds.
Burrow: A nesting burrow is dug into the ground, and may be a shallow cave or could have a long tunnel leading to a nesting chamber. These nests are often excavated in soft material such as loose dirt banks or guano accumulation. The inner nesting chamber may be lined with some material or could be bare. Birds may excavate their own burrows or may usurp suitable burrows from other animals.Birds That Nest in Burrows: Atlantic puffin, burrowing owl, great hornbill, barbets, kiwis and many kingfishers.
Mound: A mound nest is built on the ground but is a relatively large accumulation of nesting material in a tall cone or bell-shaped structure. The eggs may be nearly buried in the nest, which helps provide additional protection and insulation. The height and diameter of the nest mound will vary.Birds That Build Mound Nests: Horned coot, Adelie penguin, malleefowl and most flamingo species.
Cavity: Cavity-nesting birds are common, and will either excavate their own nesting cavities or use natural cavities in trees, snags, cacti, telephone poles or even nestled in gaps in houses or will easily use bird houses. The interior cavity may be bare or could be lined with a variety of materials, and some birds may even build loose cups inside the cavity.Birds That Use Nest Cavities: Eastern bluebird, house sparrow, most woodpeckers, many parrots, tits and chickadees.
Platform: A platform nest is a relatively large, bulky structure often built of larger twigs or sticks. The surface is typically flat or may have a very shallow depression, but not enough to be considered a deliberate cup. Many birds reuse platform nests for many years, often adding material to the nest each year.Birds That Build Platform Nests: Bald eagle, osprey, great blue heron, white stork and many other raptors and large wading birds.
Pendant: Pendant nests are elaborately woven sacks that dangle from branches, giving birds in the nest great protection from predators. Some are not suspended very far from the branches while others may hang several feet below their attachment point. Birds enter the nest through an entrance on the side.Birds That Build Pendant Nests: Baltimore orioles, caciques, oropendolas and most weaver bird species.
Sphere: A sphere or dome nest is almost completely enclosed and provides great protection and camouflage, though the trade off is that these nests are often on the ground or in low areas and may be more susceptible to predators. The nest entrance is typically on the side so it still provides protection from rain.Birds That Build Sphere Nests: American dipper, marsh wren, winter wren, ovenbird and different meadowlarks.
Birds Without Nests
While birds can be very creative architects, there are a number of bird species that have no nests at all. Some species, such as the peregrine falcon, common murre and emperor penguin, simply lay their eggs in the open or in a relatively secluded spot without actually having a nest structure. Other birds practice egg dumping or brood parasitism and lay their eggs in other birds’ nests, abandoning their parental duties completely.
Birds’ nests are amazing structures that come in a wide range of sizes and styles. Understanding more about why and how birds build nests gives birders even better insights into the amazing lives and reproductive habits of their favorite bird species. So grab your binoculars and take a look for yourself!
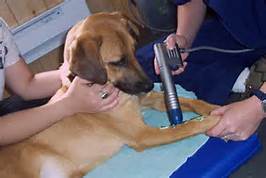
Recently a team of researchers at the School of Veterinary Medicine and Animal Science, University of São Paulo, Brazil, studied the effects of radial extracorporeal shockwave treatment (rESWT) on dogs with hip osteoarthritis (OA).1 The study involved 30 dogs with bilateral hip OA (arthritis in both hips).
The dogs underwent three weekly shockwave treatment sessions on day one of the study, day eight and day 16. Their progress was evaluated using a special pressure walkway that allowed the researchers to measure peak vertical force, vertical impulse and symmetry.
The researchers also evaluated the dogs using a blinded visual analog scale. In addition, the dogs’ owners provided input on their pets’ level of physical activity, and the researchers collected follow-up data 30, 60 and 90 days after the first shockwave treatment.
At the end of the study, all three measures (peak vertical force, vertical impulse and symmetry) in the treated dogs had improved. The visual analog scale scores also indicated improvement in the dogs’ pain and lameness, and their owners reported improved physical activity levels and quality of life as well.
The study authors concluded that shockwave therapy has beneficial effects in dogs with hip OA. Further studies are needed to determine an ideal treatment protocol.
These study results confirm the conclusions reached in a 2007 Austrian study in which similar significant improvement in the same measures was seen in a group of 18 dogs with hip OA.2
Shockwave Therapy Explained
Many people hear the word “shockwave” and immediately think of an electrical jolt. But the shockwaves used in veterinary rESWT are high-energy sound waves (acoustic energy) that are directed to a target treatment area on an animal’s body.
The shockwaves trigger the body’s own repair mechanisms, which speeds healing and provides long-term improvement.
The technology uses electrohydraulic technology to generate shockwaves. The high-intensity sound waves interact with the tissues of the body, leading to a beneficial effects including:
This activity creates an optimal healing environment, and as the damaged area returns to normal, pain is alleviated and functionality is restored.
When shockwave therapy is applied to areas of non-healing tissue, it may trigger release of acute cytokines that stimulate healing. Accompanying pain relief may be the result of increased serotonin activity in the dorsal horn (located in the spinal cord).
Conditions Successfully Treated With rESWT
In addition to osteoarthritis, shockwave therapy can be beneficial in treating a variety of other disorders in canine companions, including:
Of four dogs treated for non-healing fractures, three had significant improvement in bone healing following rESWT treatment.3
In a study of dogs with distal radial fracture non-unions (a break near the bottom of the front limb, just above the wrist joint), all dogs that received rESWT showed complete bone healing after 12 weeks, while no dogs in the control group achieved complete bony union.4
In a study of dogs with lameness resulting from soft tissue shoulder conditions, 88 percent showed improvement after shockwave therapy, with no surgical intervention.5
rESWT was also shown to significantly reduce distal ligament thickening in dogs with inflammation of knee joints following surgery for a CCL rupture.6
Shockwave therapy has proved beneficial in promoting the development of new blood vessels at the bone-tendon interface of the Achilles tendon in dogs.7
Currently, there are only unpublished case reports on shockwave therapy for treating chronic wounds in small animals. However, based on its mechanism of action, rESWT may prove valuable in managing skin flaps and difficult and chronic wounds.
What to Expect During and After rESWT Therapy
The equipment used in rESWT can be loud, and the treatment can be uncomfortable, so some animals require sedation. Since shockwave therapy is often used in combination with surgery, some patients may already be anesthetized at the time of treatment.
Treatment time depends on the strength of the shockwaves and the number of locations being treated. A common dose is 800 pulses per joint, which can be accomplished in under four minutes. Animals normally begin to experience pain relief within about 24 hours of treatment. Depending on the condition being treated, other types of pain management may be necessary as well.
When treating musculoskeletal conditions, therapy is recommended every two to three weeks for one to three treatments or until symptom improvement or resolution is achieved. Wounds are usually treated once a week for as many weeks as necessary. With arthritis patients, rESWT is typically repeated every six to 12 months as needed. Shockwave therapy should be used in conjunction with physical rehabilitation to return patients to full activity.
There are times in every dog parent’s life, even owners of large and giant breeds, when it becomes necessary to physically lift their canine companion in their arms.
It could be a very ordinary occasion like a trip in the car, or it might be an extraordinary circumstance in which you have to pick up your pet to prevent a fight or traumatic injury of some kind.
Picking up a small- or even medium-sized dog wouldn’t seem to present a big challenge, but you’d be surprised how many well-meaning people get it mostly wrong. And lifting a large or heavy dog is an even bigger project, especially if you’re not very large or strong yourself.
Before I explain how to pick up your dog the right way, though, let’s get the “don’ts” out of the way.
3 Don’ts When Picking Up Your Dog
1. Don’t involve your dog’s legs.
Your dog’s front and back limbs aren’t intended as suspension devices, nor can they be expected to support the full weight of his body if, heaven forbid, he’s lifted by them.
Children who don’t know better tend to lift by the front legs, whereas adults are more apt to put their hands under the armpits and lift as they would a child. Picking up a dog in this manner strains the muscles in the front legs and spine, which can result in torn ligaments and even a dislocated shoulder or elbow.
There’s also the risk of dropping the dog, and in older dogs with arthritis or degenerative joint disease, this type of lifting can be extremely painful.
2. Don’t “scruff” your dog.
Yes, mother dogs carry their pups by the scruff of the neck in their first few weeks of life. However, this happens only for a very brief period and doesn’t continue as the puppies get larger.
“Scruffing” is an unnatural, uncomfortable and even painful way for larger puppies and certainly adult dogs to be lifted or carried.
3. Don’t hold his collar or tail when picking your dog up.
It should go without saying that pulling on a dog’s collar, especially while lifting him, can cut off his air supply and cause him to choke. It’s also a good way to do serious permanent damage to the very delicate organs located in his neck, including the throat, larynx and trachea.
Just as your dog’s collar should never serve as a “handle” to lift him, neither should his tail. Damage caused by pulling your dog’s tail can affect the nerves and muscles that move the tail as well as those that control elimination.
Significant injury can cause the tail to hang limply, no longer move or even affect your dog’s ability to urinate or defecate on his own.
If you regularly pick up your dog incorrectly but she never complains, it doesn’t mean she’s okay with it or that she, for some reason, can be picked differently from other dogs. Many pets will endure a great deal of discomfort and even pain without yelping or crying.
Chances are your dog is sending you a signal, but you don’t recognize it as a sign of distress, for example, yawning, lip licking, looking away or struggling to get free. These are all signs of a dog who is at a minimum feeling anxious, and may even be in pain.
How to Lift a Small- or Medium-Size Dog the Right Way
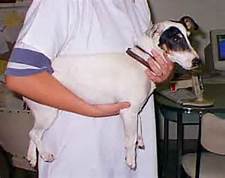
If your dog is less than 25 pounds, slide your dominant arm under his chest between his front legs, and tuck his back end between your arm and body as you lift him.
If your dog is in the 25- to 40-pound range, put your dominant arm behind his back legs, your other arm around his chest in front of the back legs and hold him against your chest as you lift.
This method will help him feel secure and comfortable as you pick him up, and will also insure you don’t accidently drop him.
For low-to-the-ground dogs and really tiny fellows, I recommend teaching a verbal “lift-off” cue. Small dogs are often startled to be suddenly lifted off the ground by a human.
If you put yourself in his place, imagining at any moment you will lose the ground beneath your feet, you can see why it could be a stressful event. That’s why it’s good to train your dog with a verbal cue that signals you’re about to pick him up. Just make it a simple one-word signal.
To train your pet to the cue, put your hands on him, say the word and apply just a bit of pressure without actually lifting him. This gives him time to understand he’s about to be lifted.
When you know he’s aware you’re about to pick him up, go ahead and do so. Consistent use of the cue will help him learn to prepare for “lift off.”
How to Lift a Large Dog
The best way to lift a large dog is with two people, so depending on your size and health, I recommend getting help if your pet is over 40 pounds.
One of you should lift from under your dog’s chest while the other lifts the abdomen and back end. Dogs tend to struggle more and risk being dropped when they aren’t properly supported while being picked up.
Lifting a Pregnant or Injured Dog
If your dog is expecting, you should avoid the belly area if you need to pick her up. Put your hands under her chest and back end instead. If your dog has an injured or sore back, get help if necessary so that you can keep her back completely level as she’s lifted.
One of my favorite techniques is the “dog taco wrap.” While your dog is lying on her dog bed, you simply fold the edges up and pick her up in the bed. You can also use a beach towel for this purpose with smaller dogs. It’s best to pick up your dog when he’s relaxed, because it’s much easier to lose your grip on a bouncy or wiggly dog. If your dog won’t sit still and absolutely must be picked up, as a last resort, you can use a comforter or blanket to scoop him into your arms.
For dogs who are frightened or in pain, it’s important to avoid the mouth area to prevent a bite. You might want to consider a homemade muzzle (as long as she’s breathing normal), as well as sliding her onto a board for support.


